
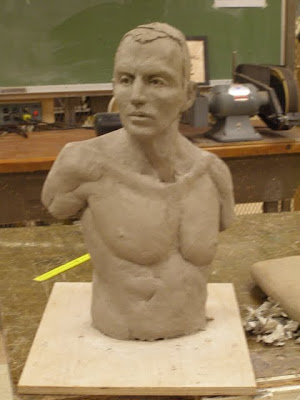
I thought some people would be interested in seeing how I prepare a clay model for firing. Here are two sculptures that I recently completed.

Above is a life-size half-torso. It’s 25″ tall, made of clay, which means that it weighed a lot when completed. I didn’t put it on a scale, but it probably weighed ~80 pounds and took two people to move it. The crack at the top of the head is due to ‘slumping’. The clay compressed, and the armature pipe inside did not, causing the top of the head to pop off while drying. This was easily fixed during the reassembly process below.


In general, the process is simple:
1. Cut the piece into manageable chunks,
2. Hollow out each piece
3. Reassemble the model, obfuscating any evidence of the repair(s).
As in most things, the devil is in the details.
These are the tools I used:
– Medium loop tool
– Large loop tool
– Sponge
– Modeling tool
– Butter knife (my favorite modeling tool)
– Clay wire
Beth Cavener Stichter mentioned that she spends 1/8 her time modeling and the remaining 7/8 trying to preserve it. That has certainly been my experience. And through the process of preservation, there are plenty of opportunities for the model to be destroyed. Clay teaches detachment. I started this post because there was no guarantee that these pieces would survive the process, and I thought it would be useful to share the process.
For those unfamiliar with working with water-based clay, some important points:
– By design, clay is soft which means that to build a large piece you need to build an armature to support your model and/or build slowly, letting the inner core dry and become more substantial as you build. Otherwise it will ‘slump’ causing the model to compress and collapse. For instance, Rodin did most of his sculpting in clay, and built on top of a cone of clay for support. In Rodin’s “Balzac”, the structural pyramid is clearly visible in the finished piece. Armatures for water-based clay need to be as simple as possible, in contrast to armatures for oil-based clays, because you have to figure out how you are going to remove it from the model later. For oil-based clays, you don’t have to worry about that, so you make the armature as detailed as possible to minimize the amount of clay you need to use, and have the entire piece be as structurally strong as possible. For this clay model, I used a 24″ 3/4″ threaded rod into a pipe flange, with a 3/4″ “T” pipe fitting on top. It’s simple, works great, and is easy to remove. If you aren’t paying attention though, slumping can be a minor issue, as I’ll share later.
– If you are going to make a mold of a piece and cast it later, you can make your mold right on the clay as-is and be done with it. Often the clay model is destroyed in the process of molding. However, if you plan on the final product being the clay version, you will have to take some preparatory steps for firing it. Most important: hollowing. Clay must be reduced so that no part of it is greater than 3/4″ thick. Thicker than that, and it has a tendency to crack during the firing process. It is also more likely that there will be trapped air in the clay, which can cause the piece to explode during firing. Yes–explode.
– Clay can shrink by as much as 20% as it dries. If it dries unevenly, this can lead to cracks. These cracks can be superficial or structural. A piece can be completely destroyed during the drying process. This is rare though if you are paying attention and monitoring the drying process closely. You can affect the rate a piece dries by covering it with plastic, ventilating the plastic with progressively larger holes, eventually exposing it completely. To slow the drying down, you can spray the piece with water. This is particularly important if the piece has thin sections like arms and legs as those will dry faster than the thicker torso. Again, the entire model needs to dry at a consistent rate, or cracks will occur.
The first cut is the hardest. I spend several minutes planning how many sections I am going to cut the piece into and where I will make the cuts. The goal is to minimize the number of sections (and resulting repairs) and make cuts that are easy to repair. Broad surfaces are easier to repair than complex detail. The joins also need to be structurally solid, so you need to consider whether or not the lower joins will be able to bear the weight of the upper joins. Below you can see that I’ve performed a lobotomy, and cut just below the chin. You can also see the newspaper that I’ve wrapped around the “T” fitting, to add mass to the interior. Both the newspaper and the fitting will be removed.


When I’m hollowing a portrait, I can usually get away with a single vertical slice either in front of, or behind, the ears. Notice that I’ve laid the pieces onto a large foam pad to protect the modeling.
My detailed description of how to reassemble:
1. Hollow the each section so that no section is more than 3/4″ thick.
2. Use a fork to pierce the interior surface. I cover the interior with piercings approx. 1/2″ apart to roughly to 1/2 the depth of the wall. This reduces the likelihood of trapped air and creates more surface area for the interior of the model to dry with.

3. Score both sides of join. I use cuts ~1/8″ apart and ~1/16″ deep. They are just random scores, but my intent in sharing is the measurements is to show that the more scoring the better. The purpose of scoring is to maximize the surface area of the join, allowing the repair to be structurally sound.
4. Paint both scored sides with clay slip. Use either a brush or sponge.
5. Join the two pieces. Press firmly, making sure that the slip presses into the scores and the pieces are joined as tightly together as possible.
6. ‘Stitch’ the join together, pulling clay from one edge to another. This may be an unnecessary step, but I’m not taking any chances.
7. With a small loop tool, carve out a channel across the entire seam.
8. Using coiled clay, fill in the the stitches and the channel, across the seam.

9. Using the same modeling tools that you created the final surface prior to hollowing, redo your finish, blending with the other modeling, so that the seam is invisible.

Voila! Now the piece was ready to finish drying. This usually takes a couple of weeks. Once it is completely dried, you can fire it for the first time.
Share